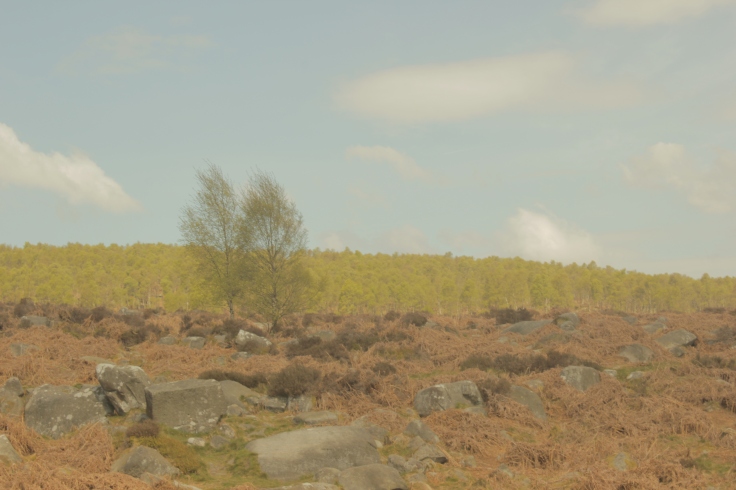
As my role is the Cinematographer I will be working along side the director to capture what they visually want in their mind. I will be operating the camera and delivering the shots the director desires. As I am in charge of this area I am planning to research different shots and styles that fit the category of what my director wants to capture. For instance I am going to research different films that have this atmosphere of a dream like adventure, like Submarine.
Submarine is a beautiful film shot in the adventure of a teen falling in love and having his heart broken. My director likes this film because of how it’s shot and colour graded. Erik Wilson, the cinematographer, captured so many beautiful shots that gripped the constant theme running throughout all of it. For instance every character has their own colour theme, that symbolises how they feel/are. I want to incorporate this into my filming as I feel it would link to the story’s characteristics. As you can see the girls colour is a warm vibrant tone as she is daring and wild, where as the boy wears cold dark colours as he is shy and keeps to himself. Just from watching the film you get all this from the colour grading as it all signifies something.

My director is inspired by the montage clips in Submarine and she wants to capture a similar thing as it links to her story and the themes.
Life On The Fells is a documentary short film about a man who has a heart transplant and runs to use it to his full potential. My director likes how it’s shot and how the story is told about why he runs and why he likes to do this. She is inspired by the story and wants to incorporate the way it’s told into her piece. My director also chose this film for inspiration because of the aesthetics of the colour grading and the dreamy-ness of the editing, and the use of the voice over. These are key elements that my directer wants to include in her story as again it would structure her story into what she wants.


These are some shots from Life On The Fells that me and my director like the most, because they’re appealing to the eye and suit the image the director is trying to portray. These are some of the shots I have been researching that come under the types my director wants filmed. She wants a variety of shots e.g ‘wide shots’ ‘close-ups’ ‘medium close-ups’ etc. So I created this collage of the various shots in order for me to research even more on shots that are like this.
180 degree rule:
I researched the 180 degree rule as I feel it might come in handy for some shots the director would like, also will help with continuity. I found this website that really helped me understand what the full concept is ‘http://learnaboutfilm.com/film-language/sequence/180-degree-rule/‘. I firstly found out that it’s called the 180 degree rule because the camera can’t move more than 180 degrees around the characters. The website gave a picture diagram and it said “in this diagram the camera must stay in the blue shaded area”:
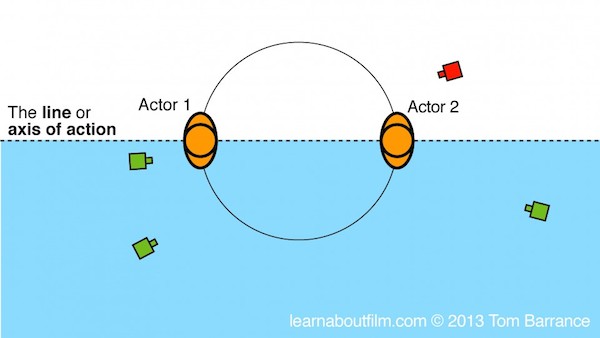
The website tells me that it’s much more interesting if you get closer and use separate shots when using this rule. It’s said to be best if the camera moves around in two different directions, called shot reverse shot. The shots will then work together because the camera is on one side of the rule. It tells me that for this rule to fully work you need to imagine a line between the two characters ‘axis of action’. It’s crucial you keep camera on the one side of the line because otherwise you’ve broken the rule, which is called ‘crossed the line’. The website tells me that if the camera swaps to the other side for a shot then none of the shots will work together, this will be because it will look as if the two characters are placed at the same place and direction. The website also tells me about ‘eye-line match’ it says ” when you join shots together using shot reverse shot, you need to be careful about eye-line match because it needs to line up” this tells me that if the shots aren’t lined up then the footage will not look right or be usable as it will turn out ridiculous. To avoid this error I need two cameras in positions that are at a similar distance from the axis.
The website also tells me that if I have more than two characters then the line might not work for everyone situated. The website then gives me tips on how to make it work, firstly it tells me that I could include a shot where the camera moves sideways. Or that I could use a shot of something outside the main action which is named ‘a cutway’. Or I could cut to a ‘master shot’ which is a long shot or a very long shot that shows the whole scene. Reading upon this has really helped me to see that if there were some obstacles with the 180 degree rule, then there are possible ways to avoid any errors. It also informs me that if a character is moving then the axis is the direction they are moving, and so if they cross the line then they’ll look as if they are moving in a different direction. Here is a diagram from the website that helped me have a more clear understanding of it:

Outside Shooting Techniques:
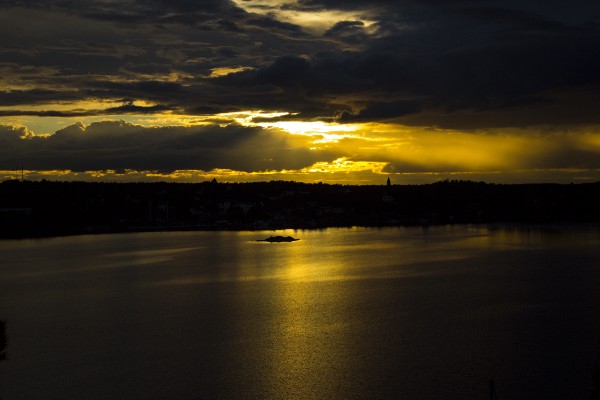
I have been researching outside shooting techniques and found a website called http://www.premiumbeat.com/blog/6-tips-for-filming-outdoors/. I found a few important and interesting tips from this website that will definitely help me for when I go to film. The first technique I found was ‘make use of the sun during the day’. Jonathan Paul says that ‘the sun during the middle of the day casts down some really unspectacular shadows for subjects’ he means at this point in the day your footage will be exposed perfectly, however it won’t be very interesting. But Jonathan also says that there ways to ‘utilize’ this. He says ‘I’ve shot during the middle of an overcast much like the image of the day and its spectacular”
Here you can see a perfectly lit and exposed shot, he says this is because “the cloud cover acts as a filter for the sunlight and diffuses the harsh light”. This is a tip I am going to keep in mind for when I go to shoot my practise shots to see what I can capture for when it comes to the real shooting. It also says you can use the sun as a backlight. By this it means you can utilise the sun to ‘backlight’ your character and give them that highly ‘sought after edge light’. I researched a photo from google images for an example and for me to have a better understanding of what it would visually look like:

Here you can see the effect really emphasises the main object. I aim to apply this tip when I am out on my practise shoot as I feel I would capture great shots with this.
The website gives me another tip to know ‘when the sunrise and sunset happens’. This is important because to apply ‘backlight’ it’s perfect to apply with the sun rising or setting because of how it’s set out. Also by knowing when the sun rises and sets I would be able to capture some brilliant shots that I believe my director would like to go for due to the theme of the story. Here is a video the website linked me to for an example:
Another tip I found useful to read on was about “when filming outdoors, subjects or actors may not get a nice balance of light across their face” this will be because of how you’ve angled your camera and how naturally the sun will be flooding in, now you can’t altar the sun. However you can use a reflector for this. The website tells me that if the sun is angled to one side, then you might find a heavy dark shadow on the other side. The website tells me that you can balance this out by using a ‘collapsible reflector’.
The last tip I found to be useful when researching was specific lenses for outdoor filming. It says “When filming outside, the surrounding environment is much more wide open than when shooting inside.” I found this useful to me to understand for when I’m shooting outside as it will be greatly different. The website informs me that 21mm or a 28mm lens is good for establishing shots. It says “can convey a sense of immense space” by this it means that you can shoot a great shot with the space you have with the lens. Also it tells me that if you need a close up of an actor or subject, you can switch from a wide to a shorter focal length with a 50mm or 85mm lense and play around with the depth of field
Reflectors For People Outside:
When researching for reflectors I aimed for a video as I found it to be more helpful. It appealed to me because I want to make sure I know how to use a reflector the right way, and part of the title for this video is ‘How to use the reflector the right way’. A reflector is a piece of material (commonly known as circular) for reflecting light in a required direction. The video firstly instructs me to not put the reflector below my subject and that you should raise it over the head. This is because if you put the reflector below the subject, it will blind them and add unnatural colours of light and shadows which won’t look good. As changing the direction of the light changes the shadows. The video tells me how the placement and direction of light can dramatically alter a person’s face. That’s why it’s important to use the reflector the right way because when using it outside and having the bright sunlight it can make the subject’s face look abnormal, which can be something you might not have intended, as it matters a lot. You need to know how to diffuse and redirect the sunlight correctly when outside as it can be difficult. After watching this video I am happy with how much knowledge I have gained and feel positive for when I am going to be using it.
Lenses For Landscapes:
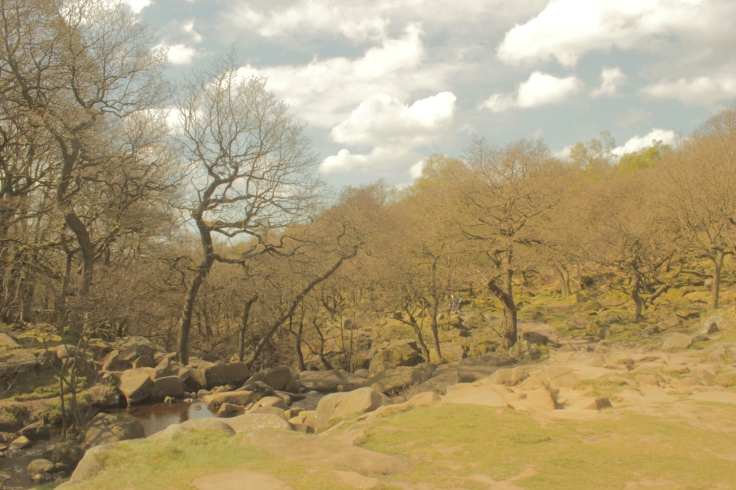
I have also been researching about lenses for landscapes. I found a website called ‘http://medium.com/@nomaddad/landscape-photography-with-kit-lens-18-55mm-32531a97e0fb‘. It’s a website about photography shots which was made by an account called ‘The Nomad Dad.” Even though it’s a photography account it really helped me to see what I can capture and produce with certain lenses. For instance Nomad gave an example of two pictures of landscapes. He first stated that the focal length is the technical term for the zoom. So if you were to produce a wide shot, your focal length would be zoomed out. Using the focal length will make your landscape look bigger as it will be the whole focus. Here is the picture he is talking about above:
For this shot he used a 18mm lens. He talks about how he shot this image with a short focal length to make the landscape look big and have it as the main focus. This has helped me to understand how correctly to use a 18mml lens and how to focus it correctly on what the main subject/focus is. For when I go to shoot my footage I will use a 18mml lens to capture the long and wide landscape shots with a short focal length.
In this left image he shot it with a long focal length and a 55ml lens. This means he zoomed all the way in. He says that he shot the image with a long focal length because it creates one subject in the image to be the main focus. He also talks about how this then creates the sun and sun rays to ‘pop out’. This has helped to understand how to use a 55ml lens with a long focal length. For when I’m filming my footage I know what lens and focal length to use on a wide shot with a focus point, for example a mountain or tree.

Nomad also talks about how important it is to think about the short and long focal lengths as they have two very different feels to them. He also says that “The focal length also has an impact on the Bokeh effect. The Bokeh effect is the amount of blur in the photo. When I go to the Peak District to have a practice run I plan to apply these rules so I have experience when it comes to the real filming. I also plan to use the lens types in between 18mml and 55mml so I know how they would work and look visually.
Nomad then goes onto explaining layers and depths in the images. He talks about how useful layers and depths are because it makes the image look bigger and more breathtaking. He says “In the right image I have trees in the foreground and in the left image, there is nothing in the foreground” he says how with subjects in the foreground you can make the landscapes look more dramatic. From looking at these two picture I can see what he means, the left image has more of an impact on me rather than the right one.


Nomad talks about the different positions and how they can have different impacts on your shots. For instance he takes two photos that are 30 metres apart. With the left image it’s taken with the sun and sunlight in the centre of the water. He says “that helps to make them the centre and focus of the shot” this shows me that anything can create an impact from it being the centre of focus. I plan to use this objective when I go for my practise filming to test out different objects that could be the centre focus for one of my shots. As you can see in the right image from it being 30 metres apart, the sun and sunlight are in a different position, which creates a different type of impact. As it doesn’t become the centre of focus you notice the other surrounding features. He says “look at how much the position can change”. This shows how important it is when taking shots as different features are really important to create different atmospheres.


He then lastly talks about composition. He says in the left image having sunlight reflecting onto the water adds ‘perspective to the image’. By this he means by having the reflection onto the water makes it look warm and nice, but if you took the reflection away then your opinion would change. He says “perspective is really important for wide shots, to make them look more dynamic and bring them to life.” which is true because everyone has different thoughts when looking at shots, everyone’s imagination will be different relating to how things look. He says “the sun’s reflection adds depth and dimension” meaning the shot wouldn’t be that appealing to the eye if it didn’t have the sunlight reflection as it makes the image what it is. With the right image the sun has been placed to the side of the rule of thirds, making the picture not as interesting as the left. With the image focusing on the wooden walk path the rest of the image is blurry which in my opinion doesn’t have that strong feeling of depth and dimension. This is something I need to be careful of when going on my practise shots as I don’t want to make this mistake of making my shots not very interesting.
Primary:
This a shot I took with the 18mm lens. I found it to show and open up a lot more space.
This is a shot I used with the 55mm lens. I found it great when focusing on one main object against the background.
Textual Analysis:
I have chosen two obvious adventure films to analyse on how the camera work creates meaning and communicates a message. For example the first adventure film I chose is Lara Croft; I chose Lara Croft as it portrays adventure perfectly in its plot. For example in this scene below of her ‘defending the manor’ you can see how quick the camera moves when something is about to happen: as she gets onto the big chandelier it creates a feeling of anticipation because you know something is going to occur, but you don’t know what exactly. Then as the villains come through the glass the camera cuts fast to a close up of her face which instantly sets the mood. Then the camera moves fast as the fight scene starts which creates an atmosphere of tension and excitement from how the camera is moving. From the camera moving fast with all these different angles it draws you in to see what is going to happen next, the different paces created helps with making the atmospheres. Then when Lara is on the ceiling and more bad guys come to supposedly fight, the camera movement is slowed down to a pace that creates an uneasy feeling. As the fight picks up again the fast chopping of camera movement keeps you on the edge of your seat because the camera is creating all these atmospheres of fear and exhilaration due to the action happening.
Here we see in this famous Indiana Jones scene the pace starts off slow, similarly to Lara Croft and a tense atmosphere is created when the quick camera movement kicks in. You can see as Jones goes to make the change of treasure and a sack the camera slows instantly making the audience focus on this one feature as the camera is mostly still. But instantly as the swap goes wrong the pace of the camera movement speeds up and is choppier, creating a tense atmosphere as everything is falling apart around him. The quick shots of the camera shows the tragedy and danger of what is occurring, making the audience nervous as we don’t know what is to come next. This relates back to the Lara Croft scene as the fight kicks in you’re not quite sure what to expect. The pacing of the camera movement goes from slow to fast to slow, which I find works extremely well to create different emotions and atmospheres through speed. This is highlighted in a scene where the villain tricks Jones and the camera movement is slow which instantly creates an anxious feel because it looks as if he won’t make it out. But the pace quickens up to a feeling of exhilaration as he gets out. In my opinion I believe both film clips really imply how important camera movement is and how it tells the atmosphere and story. From researching and analysing these two film clips I feel I have stronger knowledge of the effects of camera work and how meaning can be created through this.
Split Screens:
When researching split screens I came upon this website ‘https://www.premiumbeat.com/blog/split-screen-editing-and-composing/‘ and it firstly showed me this video from Vimeo consisting of different split screens from films. From watching the short snippets it already helped me to see how they’re done it and how to incorporate them into something cinematic.
The website informs me that split screening dates back to the 1890s. Apparently split screening is one of the oldest techniques used by film editors. An example of an early use of the split screen dates back to 1903 film ‘Life Of An American Fireman’. The way they incorporated the split screen was of the man thinking of his family, like a thought bubble. This shows me that split screening was experimented with from an early age.
In 1957 it appeared in ‘N.Y, N.Y’ which the director Francis Thompson actually experimented with different lenses to get the kind of split screening he pictured. Over the years split screening was used for all kinds of methods, like censoring a film scene. In 1958 the film ‘Indiscreet’ used the split screen techniques to get past censors. There were issues with the scenes of showing the two actors in bed together. So the actors were filmed in separate beds but their conversation was as if they were in the same bed together. A modern example of using the split screen technique was in 2000 of the film ‘Requiem For A Dream’. It was used by having the two actors in bed but to show love and compassion, from the ways of using close ups of them holding each-other. Rather than showing ‘pure erotica’. It was said that it was “used to draw attention to the couple’s caressing hands.”
In 1961 the split screen method was used in the Walt Disney film ‘Parent Trap’. The website informs me that this was the first major blockbuster movie to have used the split screen techniques to star the actor twice. The website showed me a behind the scenes video of making the film and how they made it work. To make it work they would film the scene twice but with an actor double so it would work out when editing. It also says “Two different exposures using a black matte were primarily used, often hiding the split screen behind background elements like door frames and bed posts.” I think it must have been difficult to create while making sure nothing was overlapped like the door frames or bed posts, I would like to try this technique out if my director is interested.
One of the most famous uses of split screen was in 1968 of ‘The Thomas Crown Affair’ which features a multi-screen montage. This montage was in fact to cut down the film’s run time. A film montage is something I know my director wants to incorporate into her film, so it could also really benefit for time wise as well.
Composition Techniques:
When researching composition techniques, I came upon this website which I am familiar with so I knew it would hold some valuable information ‘http://nofilmschool.com/2015/09/9-composition-techniques-make-images-eye-catching-biological-level‘. It firstly states that “The composition of a shot can not only make it pleasing to the eye, but it can also speak volumes to your audience” this instantly shows me how important it is not only to you but your audience as well to follow and understand the rules of composition. Steve Mccurry is a photographer who put together a video describing and showing how the rules should be in shots:
Instantly from researching I feel much more confident knowing all these different rules and how to apply them just from watching this video. I aim to apply them all when I’m filming my practise shoot.
Rule Of Thirds: “The most well know rule of composition. By placing points of interest along one or more of the imaginary horizontal and vertical lines. Your image will be more pleasing to look at.”
Leading Lines: “Imagery lines, also called vertices, help lead your viewers eyes into your image, which creates depth.”
Diagonals: “Diagonals are vertices that lead your viewer’s eye, but instead of them being lead into your image, they’re lead across, which creates movement”.
Framing: “You can use something natural, like windows and doors to create a frame within a frame”
Figure to Ground: “By creating contrast between your subject and the background, you can create depth, as well as help your viewer orient the subjects within the space.”
Fill the Frame: “the size of an object within the frame directly determines how much aesthetic energy (i.e. importance)”
Centre Dominant Eye: “by positioning the dominant eye of your character in the centre of the frame, it gives the illusion that it is following you.”
Patterns & Repetition: “using repetition will immediately attract your viewer to your image, but including an element that breaks the pattern will keep your images interesting and your audience engaged.”
Symmetry: ” symmetrical faces are considered to be more attractive”
Tracking Shots:
For researching tracking shots I wasn’t fully sure what it meant so first thing I researched was the definition from Wikipedia. I found that ‘a tracking shot is any shot where the camera moves alongside the object it is recording’. Wikipedia then told me in cinematography times how it was done. It’s done by having the camera mounted on a camera dolly that is then placed on rails. (It’s said the rails are like a railroad track). I then researched for example and found this website ‘http://www.shortlist.com/entertainment/films/the-10-coolest-tracking-shots-in-film’. It gave me examples of the best tracking shots and I chose my favourite two to look at.
For example Pulp Fiction:
It says “Quentin Tarantino wasted no time in heightening the tension or the fateful meeting between Butch and Vincent. Treading down a shortcut, we’re with him every step of the way” from watching this I can already understand how it’s done from seeing what the camera angles and movement formations are like. From looking at how the camera follows you get a vibe of tension as if you’re following the character yourself.
The shining:
This tracking shot from The Shining is one of the most iconic shots of Stanley Kubrick’s horror masterpiece. It says “the way the camera lingers right behind Danny’s wheels is almost as haunting as the guests themselves” from watching this tracking shot it gives me an anxious feel from how the camera is moving by following Danny. The different ways and moving and tracking shots can be clever when it comes to making you feel a certain way.
I personally think a tracking shot would fit perfectly in the style of my director’s film. Considering what she wants with the style and themes, I think using a tracking shot to show the characters journey would be fitting to the story.
Hand Held Shots:
For hand held shots I firstly researched in this book I borrowed from the library called ‘Cinematographer Theory and Practice, Image Making for Cinematographers & Directors‘ which is by a man called Blain Brown. The page I found which had information about Hand Held shots was 216.
Handheld is where at any time the camera operator takes the camera in hand or even on the shoulder. It says in the text “handheld was the primary means of making the camera mobile in cases where a dolly was not available or not practical (on stairs)” by this I understand it means it’s easier for the camera to have movement because having a dolly wouldn’t be practical for certain aspects just like filming with stairs. Hand Held shots are mainly used for artistic purposes. Handheld shots are also similar to making it look documentary style.
I then went on to research techniques for handheld shots and found a video on 7 tips about it. The website is ‘http://nofilmschool.com/2016/07/7-handheld-shots-will-help-make-your-film-look-more-cinematic’. It says ‘gimbal movements’ and that’s because a gimbal keeps the camera stable. From watching this video I gathered important factors that I can use when filming, as it will help to make the film cinematic. My director wants some handheld shots to link to a documentary feel as that’s how she wants some parts of the film to be told. However from experience in the past a gimbal is something I will not be using, as in fact I find it extremely difficult to operate and it consumes a lot of time when setting up. But I found these various techniques to be helpful as you can still apply these techniques without specifically using a gimbal.
For instance the first technique ‘Push & Pull’ in motion draws importance when ‘pushing’ in. By pushing it shows you’re emphasizing something important. By pulling out you’re revealing space or making somebody feel isolated.
Booming is the second tip which is used for raising or lowering the camera on a vertical axis. To either reveal something new or to show more of a scene.
The truck/dolly keeps the subject framed. It establishes more of a scenery shot, which moves from side to side.
The follow/lead moves away from the subject but it’s also coming with you. It can either be in front of the subject or behind the subject.
An Orbit is going around keeping focus on your subject. But it’s focused inward, showing a new perspective.
A Rotate is focused outward unlike the orbit, actions happen around it. With a rotate you pan around to reveal a space.
The Tilt is where it comes up to reveal something like an emotion, or an action.
Drones:
I know my director would like to incorperate drones into our film so I researched why they’re used and found this website’ http://www.independent.co.uk/arts-entertainment/tv/planet-earth-ii-sir-david-attenborough-how-drones-are-transforming-tv-production-a6898336.html‘. It talks about how gear has reduced to being smaller and lighter, as aerial filming no longer has to involve expensive helicopters and static cranes. It says “Production companies are increasingly using drones to nail those shots that require dramatic panoramas, adrenaline filled action sequences, 360-degree views of subjects or literal birds eye views.” meaning drones are becoming a more popular necessity for certain shots. Ben Sheppard the managing director of Spider Aerial Filming says “No other filming method can start a sequence inside a building and end up at 400ft altitude in one uncut shot” reading this shows me that drones are important for the shots that are quite impossible to do. For instance the sequence inside a building Sheppard talks about, you need a drone for this to happen.
Drones allow the reader to build a better mental picture of the layout of the land. An example the article gives me is of a news story about immigration and how it shows you wide shots of the poverty they live in so everyone can see how bad it is. Or when there’s a car chase using a drone for the wide shots to show excitement. It says how unlike helicopters, drones are able to get down to ground level with smaller shadows and less disturbance. Also drones can do indoor shots as well. It also talks about how without drones certain shots or scenes can be more complicated and turn out expensive.
How to Colour Grade/Themes:
Researching how to colour grade is really important to me because I know with the style and the theme of my directors film, it will need to be colour corrected. With me being the cinematographer, it’s ideal I know how to do this as I am in charge of all the shots and how they look. To start off it’s really easy to colour correct on premiere pro cc, it’s just adding layer onto layers. By this I mean you firstly start off with a ‘adjustment layer’ over your footage, as you need all the colours to be the same in the similar scenes you have recorded. Tara, the man who created this video said that the adjustment layer is ‘see through’ when you first start off, then when you start changing the different aspects you’re adding the different layers on top. For example in the effects tab there is something called the ‘hue saturation curve’ which is where you can change any of the specific colours to a light or darker tone. So with the orange colours that are captured, you could change them to a beige orange colour on the panel or a neon orange. But that would apply to all the oranges used in the shot. But before you start applying this you need to colour correct it all. By this I mean you go to ‘basic correction’ and tamper with the highlight and shadow gadget. It’s all really basic once you get the hang of how it all works. From watching this video I believe I now have a well understanding of how to colour correct and I am eager to practise this.
For more knowledge and experience I tested out colour grading myself. I tested out the colour grading on the footage I filmed on using a shoulder-rig as that is a piece of equipment I will be using. From researching how to colour grade I found it easy to access the different gadgets and operations. For example I firstly enhanced the ‘shadows’ and ‘whites’ to get that dream style effect, which changed the windows light which I found looked dreamy. Then with the ‘hue saturation curve’ I applied a bit of shadows around the edge of the frame to again have that dreamy effect. Under the ‘hue saturation curve’ there is a colour wheel where you can change the tone of the colours found in the footage. So I changed the tone of the colours to a brighter contrast that made it look like the atmosphere is sunny. I did all this because I know when it comes to colour grading this is on the lines of what my director wants it to look like. She wants the footage to look dreamy with warm tones of colour. From having my own go at colour grading I can already see how much of an impact just filming will have. For instance I can see that the ISO levels were to exposed which from colour grading you can obviously see. For when I go onto my practise shoot I am going to make a list of what to double check twice, like exposure.
Colour Grading Implications:
I found this subject hard to research as it was mainly focused on the director and editors duty as that’s what colour grading falls under. However, I found this website to be most useful ‘http://filmmakermagazine.com/87033-how-to-survive-first-color-grade/#.WPS3KtLyvIU‘ created by Michael Medaglia and Jalal Jemison. Colour grading is one of the most essential parts of a films process as the colour adds to the story and creates different themes. For example in the style of how The Matrix is filmed it wouldn’t be what it is without the colour grading. The dark colours of greens and blacks creates a theme of tension, action and fantasy throughout the entirety and adds to the category of it being ‘sci-fi’. Because that exact neon green used isn’t a natural green, it suggests technology which is a major theme in The Matrix. Colour grading helps tell the story. A point is made by Michael that “if you didn’t light for it, you may not get the look you want” meaning when I’m filming I have to make sure the lighting is perfect otherwise I can complicate editing and not have the outcome that was expected. Michael also says it can complicate the contrast and shadows, so again it can complicate the editing if not done correctly. They say without perfect filming and lighting it would be hard to get the colour grade you wanted, you need to rely on imagery.
Shoulder-rig:
I know my director would like to use a handheld camera for various shots to fit with the theme of the story, so I researched what a shoulder-rig is. A shoulder-rig is a piece of equipment that moves alongside the cameraman. It enables you to capture movements and to travel with the subject. I think using a shoulder-rig will be more ideal than just holding a camera. Because a shoulder-rig will provide that footage of looking handheld, but it also will be swift and steady as that is how the equipment is designed.
When researching I found this website to be most useful ‘filmshortage.com/back-basics-guide-using-shoulder-rig/‘. The website tells me how shoulder-rigs are light and easy to use, so you have to be careful when filming as the footage could be shaky if not careful. It says “Using a shoulder mounted camera is a great way to capture footage from a narrative view” and a narrative view is exactly what my director wants for most of her shots. However, you need to be careful when using a shoulder-rig because it needs to be supported in the right method. You need to create a counter balance for equal weight to be put in areas. For instance, you should put weight onto the shoulder mount so it stops the camera side being so heavy. The website also gives me tips on how to keep in sync properly with the camera’s movement. It says you need to “walk softly, letting your knees bend naturally and rolling on the balls of your feet with each small step rather than stomping around.” by doing this you’re going to end up with smoother footage rather than it being wobbly and shaky from you not walking in sync. You need to be aware of your surroundings for no implications to happen during filming.
Here you can see I hired out a shoulder-rig to test it myself. I found it easy to use once having the right support and getting the hang of it. I did find it quite shaky when looking at the footage but I know for next time I’ll be more careful and aware when operating it. As you can see I practised walking and running as in my director’s film we are following a runner and a walker. So with using a shoulder-rig I will be travelling with the subject.
Golden Ratio:
When researching the Golden Ratio I found it much easier to watch a video explaining what it is, rather than a website. The only video I could find that actually helped me to understand was this video:
The golden ratio is down to a maths equation. The maths equation equals in the number ‘1.618’ which the formula creates the ‘golden spiral’. I find the golden ratio to be quite complicated but from watching this video I can see why many people would use it for their shots. I can see this because the video talks about how if you overlay the golden spiral on top of your shot, then the focal object should line up with the inner section of the red lines. Which should equal in this:

It tells me how you can expand on those red lines along the length of the image and mirror them on the other side. This will then create a ‘phi grid’. A phi grid is quite similar to the rule of thirds, however the phi grid produces a more balanced image than the rule of thirds will do.
(found image from google images for a basic understanding.)

After researching and understanding what the golden ratio is and how it works, I feel it will be important to test it into shots I will be capturing. As I’m still a bit uneasy on how to do this, I think it would be ideal for me to apply this when on my practise shoot.
Depth Of Field:
When researching the meaning and concept of depth of field, I found this website to be most useful ‘http://www.elementsofcinema.com/cinematography/camera-depth-of-field/‘. It tells me how the area in front of the camera that appears sharp in the frame, is the depth of field. It says “depth of field is defined as the range of acceptable focus on a shot” which helps me to see that depth of field is important to understand when capturing the perfect focused shot. The website tells me how depth of field is an important concept for cinematographers and camera operators to master. This is because you often need to manipulate focus to achieve a desired affect. It also says how focus draws many audiences attention to a specific portion of frame. From reading this Intel, I find it important for me to remember these key points for when I’m capturing a shot so I get the perfect focus I want. Depth of field can be shallow or deep. A shallow depth of field is the kind in which part of the frame is appeared soft or out of focus. On the other hand a deep depth of field is where the entire frame from the foreground to the background is sharp or in focus.
The website informs me that there are three main things of the camera affect in depth of field. For example aperture, mostly influences depth of field. It says “wider the aperture is, shallower the depth of field will be”.

Here is a good example: imagine that the camera is on the left hand side of the image, represented below by the aperture. It says “The 100mm value represents the focal length of the lens”. I find this example from the website to help me have a better understanding as it shows you how it can work.

The area in red represents the depth of field or it represents the distance in front of the camera in which the picture is in focus. The black in the example represents the soft focus. As you can see it changes with the specific F number you have. It says how the vertical lines represent the sharpest focus, and can also be called ‘critical lines’.
The focal length is the second factor that affects the depth of field. A wide angle lens, also known as a short lens, would provide an image with more depth of field than one with a long lens, also called a ‘telephoto’ lens.


(these are images the website has provided)
Focus distance is the last factor to determine the depth of field. It says that the closer the focus is to the distance is to the camera, the less depth of field you will have.

The example above shows how you can clearly see what the main object was to be in focus, this then blurs out the background for it to stand out.
It says “you are better off relying on f-number and focal length to just depth of field” as they work better visually. From researching I am now happy that I fully understand depth of field and aim to remember all these key elements when shooting my own footage.
ND filters:
When researching ND filters I found this website to provide the most information on the topic ‘https://digital-photography-school.com/using-graduated-neutral-density-filters-for-landscape-photography/‘. I had an idea of what ND filters were but I now having a full understanding of what they are and how they work from this website. ND filters (neutral density) are a rectangular piece of resin/glass with a gradient from dark to light. They are called neutral because the dark part of the filter should not make any colour difference. One of the main things ND filters apply is that they hold light back so part of the scene that is the brightest does not have overexposure. It tells me how if you were to expose a scene without using a ND filter, the foreground would be well exposed but the sky would be overexposed. I can see now how important it us to use ND filters for when shooting outside, they’re a key piece of equipment. The website advises you to use them at ‘golden hour’ where the sun rises and sets. Or it says using them throughout the day will slow the shutter speed to make water smooth and silky. It says ND filters are made in different strengths, to compensate for different lighting conditions.
There are two types of ND filters you can use. There is the ‘soft edge’ filter and the ‘hard edge’ filter.

The website says “The hard edge filter has a very definite transition between the dark gradient part of the filter and the part that is clear” which I find would be useful for when the sun would be setting as the colours would be dark. It also says “The soft edge filter gently blends the gradient across the filter, so the line is less obvious” I find this filter would be best for when the sun is rising as the colours would be bright. After researching ND filters I will definitely be using these for my footage for the certain shots I will be capturing.

May 22, 2017 at 10:05 am
I think an introduction to your research which explains that you went through a voting process and roles were divided up within your team.
I think it would be better to create a new post for your planning documents. Add this in the menu under the research post. So, you could change the name of this post to Research Portfolio and call planning “Post 4 Planning”. Then just change post 4 to 5 and 5 to 6.
LikeLike
May 22, 2017 at 10:30 am
This is a very varied and sustained piece of research. You’ve included several different primary and secondary sources and within each piece you have related it to your planned product. You’ve started with influences from different styles of documentary to romantic drama. You delve into a lot of different shot types, outside lighting conditions, composition and how to track objects. All of this was related to your proposed film and you mix this in with your own experimentation. This was a great piece of work because you researched the theory of lenses/ focal length/ aperture and the effects on depth of field, and then carry out your own test shots to gain a better understanding.
Your bibliography is very detailed but you should learn how to use the Harvard Referencing method for adding references. Add this list to your separate Bibliography post but you can leave the list you’ve already created in this post.
This is excellent work. Well done.
LikeLike
May 22, 2017 at 10:35 am
The planning documents are comprehensive and you have indicated who in your team was responsible for their creation. The story needs to be rotated 180 degrees and re uploaded please.
LikeLike